| It all started when I decided to pull the cylinder head studs on my Pongo. I could / should have left them be, but more than one of them were pretty rusty, so I got stupid and decided to pull the studs. Part of the reason for wanting to change them was that I had a shipment of studs coming from APE, American Performance Engineering. Anyway, two of the studs absolutely froze. 6 removed "properly" so I started in on the first frozen one. After twisting the stud and deforming it (Yes, twist!), I cut it off to get purchase closer to the engine case with my stud puller. Then it snapped just off the case. OK, so I get more purchase... only to have it break below the case. |
| What I should have done! After talking to a bunch of people, I came up with a plan of attack for the other frozen stud. It's hard to say whether this procedure would have worked for the already broken stud. BUT it worked for this one! First step was to soak with anti seize penetrant compound over night. I got the propane torch out and heated the cylinder case near the stud. I'd feel the case near where I was heating to ensure it was getting warm. Then, I'd work the stud trying to unscrew it. When the tension increased, I would stop, back off 1/4 turn, and apply more heat. Then repeat the previous two steps. In 15 or 20 minutes, I had the other "frozen" stud removed without issue. |
| On to fixing the broken stud. This stud broke below the case and left a rough, uneven top surface. I immediately dismissed hand drilling. At first, I considered how I would mount the engine in the mill, but it was too tall. More pondering and I realized that I could build plates to bolt to the engine which would let it hang off the front of the table low enough to allow for drilling. This seemed like too much work. Next, I considered EDM but I worried about the process ruining the engine case. When considering this type of repair, precision is paramount. Any machining, drilling, or boring absolutely has to be straight. |
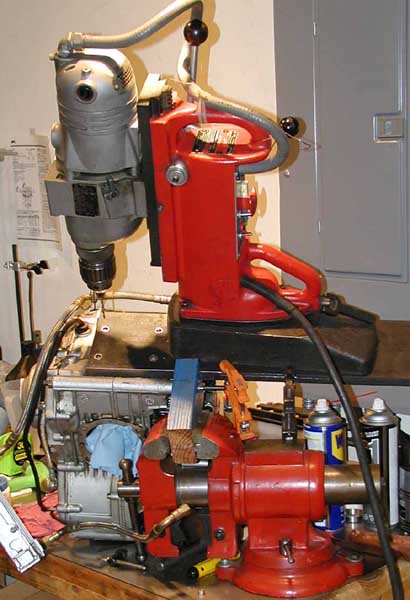
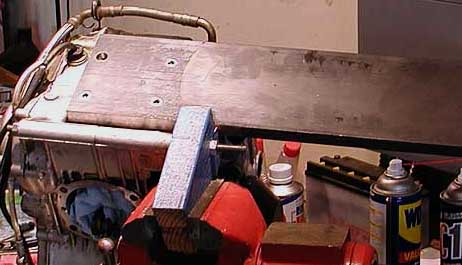 I remembered that my machinist friend had a mag base drill... I've used it a couple of times. It will enable me to drill straight and true, but needs a ferrous platform to attach to. I head to the local metal supplier and got a piece of 3/4" thick steel plate measuring 6" x 26". I then counterbored 3 holes corresponding to the good threads and drilled and tapped the "Bad" hole. |
 For the "bad" hole, I devised a plan.
While the plate was on the mill (and not on the engine), I threaded the hole for M10x1.50, which is the same threads as the cylinder studs.
Then, I counterbored it so the head would be flush.
I got a M10 allen head screw and put it in a fixture in the lathe and drilled its center with 1/8" drill bit.
I fitted the plate to the engine and then took measurements and cut the pilot bolt short so that it would stop against the broken stud before actually seating in the counterbore of the baseplate.
The purpose of the pilot bolt is to securely hold the drill bit for the initial drilling of the broken cylinder head stud and ensure the bit starts on center.
For the "bad" hole, I devised a plan.
While the plate was on the mill (and not on the engine), I threaded the hole for M10x1.50, which is the same threads as the cylinder studs.
Then, I counterbored it so the head would be flush.
I got a M10 allen head screw and put it in a fixture in the lathe and drilled its center with 1/8" drill bit.
I fitted the plate to the engine and then took measurements and cut the pilot bolt short so that it would stop against the broken stud before actually seating in the counterbore of the baseplate.
The purpose of the pilot bolt is to securely hold the drill bit for the initial drilling of the broken cylinder head stud and ensure the bit starts on center.
|
 The hard part!
Setup really is the hard part.
Ask any machinist... you say that any given operation is easy.
Well, of course the actual cutting or drillign is easy, but setting everything up to enable this is what takes so much effort!
I used the 2x4 (painted blue) to hold the engine in place.
Some 10mm all thread is holding the engine to the 2x4 which is in the bench vice.
The steel plate is bolted to the engine with 3 M10 allen screws that are 30mm long.
Then the pilot screw is threaded into the "bad" hole.
Notice the two clamps on the closest edge of the plate.
They are to make a ledge to lean the mag base drill upon.
Now, consider that the mag base drill weighs over 70 pounds!
I inserted 1/8" drill bit into the 3/4" chuck and carefully positioned the mag base drill until the bit would pass into the pilot bolt without noise or deflection.
(Click image for full size image)
The hard part!
Setup really is the hard part.
Ask any machinist... you say that any given operation is easy.
Well, of course the actual cutting or drillign is easy, but setting everything up to enable this is what takes so much effort!
I used the 2x4 (painted blue) to hold the engine in place.
Some 10mm all thread is holding the engine to the 2x4 which is in the bench vice.
The steel plate is bolted to the engine with 3 M10 allen screws that are 30mm long.
Then the pilot screw is threaded into the "bad" hole.
Notice the two clamps on the closest edge of the plate.
They are to make a ledge to lean the mag base drill upon.
Now, consider that the mag base drill weighs over 70 pounds!
I inserted 1/8" drill bit into the 3/4" chuck and carefully positioned the mag base drill until the bit would pass into the pilot bolt without noise or deflection.
(Click image for full size image)
|
 After perfectly aligning the drill on the pilot hole, I energized the magnetic base.
What's neat about the drill is that the base stays magnetic once energized, even without continuous AC applied.
But, I still plug it in and re-energize before doing any drilling.
After perfectly aligning the drill on the pilot hole, I energized the magnetic base.
What's neat about the drill is that the base stays magnetic once energized, even without continuous AC applied.
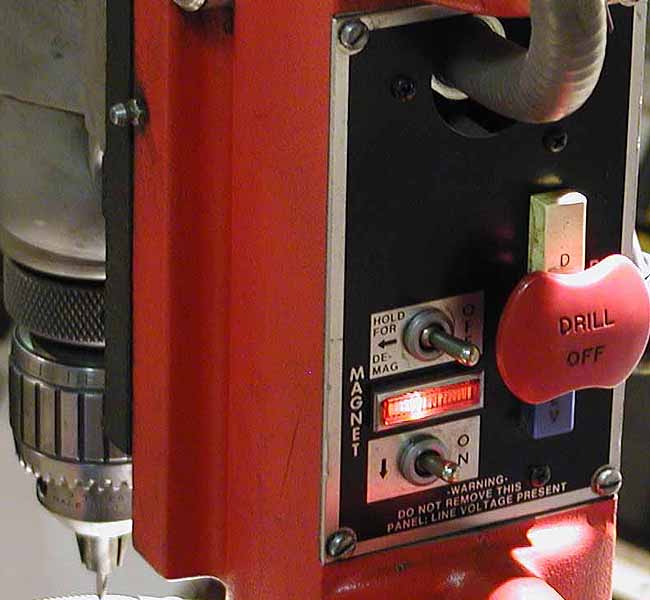
But, I still plug it in and re-energize before doing any drilling.(Click image for full size image of the control panel) I set the drill to the low speed setting, which is like 150 or 300 rpm. I got some cutting fluid and powered up the drill. This industrial ship and building overhead drill is exceptionally loud so I used ear protection (and safety glasses). |
|
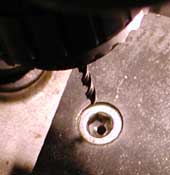
I drilled with the 1/8" bit carefully and slowly and it eventually poked through the broken portion of the stud.
I backed it out and removed the bit form the chuck and the pilot screw from the hole.
Next, I went through many sizes of the drill index.
My plan was to increase the drill size until at the root diameter of the stud itself and attempt to salvage the original threads.
All went well until the last bit.
It grabbed and started threading down into the case.
I hauled up on the quill, literally ripping the threads up.
Now it was time to think a bit and gather up some parts. I visited Mc Master Carr and ordered up some "long" M10x1.5 helicoils, the proper tap, and the insertion tool. I ordered at like 10 pm Sunday night and the parts were delivered on Monday! Leaving the mag base drill and plate set up, I now reamed the counterbored hole in the steel plate to just larger than the threads for the helicoil tap. It's ok to allow this to protrude a little into the engine case. But I really wanted the steel to not interfere with prepping the case for the helicoil. Now, I switch to kerosene as my cutting fluid and set up to drill out the engine case to accept the helicoil. I measured the depth of the hole in the case and marked the drill bits so as not to make the hole any deeper. The two plunges made were trivial. Finally, I inserted the M10x1.5 helicoil tap into the quill and lubricated it with kerosene. I applied a little downward pressure to the quill while rotating the chuck by hand. I would turn the tap in a half turn, then back it out a quarter turn to break the chips. The resistance of the electric drill motor was such that I had to insert the key into the chuck to use as a handle. After a half hour, I had the threads cut and pumped up fore arms. Zina helped me lift down the bag base drill. :-) Inserting the helicoil itself was anticlimatic. It almost fell in. This was so easy that I couldn't help but chuckle at the irony of this final and oh so important step. |
| Notice that the above steps were performed for a broken stud in the horizontal (front) cylinder. Should you be faced with a broken stud in the vertical cylinder, you cannot simply bolt a plate flat on the engine. For you, I suggest getting an additional piece of 3/4" steel plate that is 6" x 6" to act as a spacer. See, around the vertical cylinder there are "humps" in the engine case that prevent a plate from bolting flat to the deck. The smaller plate will move the larger plate up off the mating surface of the crankcases. All this does is make the process a little bit more tedious. You also may need to do more machining to the spacer plate to clear said obstacles on the cylinder deck. But there is hope. I talked one gentlemen through this process without much hand holding and he had success -- on the vertical cylinder. My hat is off to Mr. T.M. He accomplished a challenging task ... I didn't tell him as much as relayed here. And there are a few details that I haven't revealed here. |