Why?
Besides why not, I was going to try to stroke the crankshaft out 2mm to 70mm. I talked to many people and finally decided not to try this - as they say that any stroke longer than 68mm will hit the timing shaft. BUT I'm quite glad that I did commit to the full rebuild, as there are a few problems that were uncovered that would eventually require me to do this anyway.
OK This page is huge. Now that the rebuild is compete, I've reordered the info chronologically. Sorry, the pictures don't really happen until towards the end, near March of 1999.
Initial findings (10/98)
- Oil galley plug. Ther are 3 oil galley plugs in 900 cranks, two small and one very lagre one. The large one is on the side of the crank, facing the crankcase. Mine was loose and had been unscrewing, grinding off the face of the plug. It no longer has a slot for a screwdriver.
All the time that I've had the bike, I've noticed that there was some aluminum fragments in the oil screen. Most dealers DO NOT check / clean the oil screen when they change the oil and filter cartridge. After talking to many people who service and build Ducatis, I've heard that this affects 91 and 92 models. The oil screen is attached to the bolt just below the oil site glass, visible above.
- First and sixth gears. Both of these gears have pieces of metal removed from the faces of the gears. I've heard that cryogenic treatment can harden the components tohelp prevent this from happening again. Oh, and for first gear, the drive gear is part of the transmission input shaft. Bonus.
- Output shaft and crankshaft endfloat. Both of these shafts had a little too much endfloat, which is lateral play, or along the length of the shaft. New bearings and spacing shims will fix that. I'm sure that too much play on output shaft would lead to outright bearing failure.
1998:
I've gotten the frame powder coated white and the wheels polished. I'm now waiting for parts... as always.
1/10/99:
Re-polished the Falicon supercrank and assembled the rods with new half bearings. Got a pic of the crank... need to develop and scan it.
1/17/99:
This weekend, I cleaned up the heads. Got the carbon buildup off with an aluminum wire brush. The brush gets all the carbon off and leaves the aluminum underneath it clean.
Ever noticed those little bolts or screws that go into the head right near the spark plug? My 900SS is so old that it isn't a hex screw, instead, it's a set screw with loctite. Needless to say, I was screwed when one started leaking. Snap-On screw extractor fixed that problem. I tapped out the holes with a handy 6x1.0 tap with grease in the flutes to trap the shavings. Now I need to have the surfaces where the bolts go machined flat so they'll seal with crush washers.
Put the heads in the oven and heated them to 300 degrees F so I could bang out the valve guides. Never install valve guides that don't require machining. I bought some last time that came at the looser tolerance. Now I'm replacing them. While banging on the valve guides, the inside camshaft bearings fell out of each head, so I popped out the outer bearings, as well as the bearings in the cam caps. One of the bearings seemed a little loose, so all 6 are getting replaced. What's neat about the 900 is that the cams ride in oil fed wheel bearings. They're all common bearings, so I can get them from my bearing supply house instead of paying 2x as much from Ducati.
With the valve guides out, there's room to work in the ports. Got one of the heads detailed... cleaned up all the carbon and repolished the ports and combustion chamber.
Also looking into replacing the silly blade type screws that hold the crankshaft end cover on the left side with some phillips type ones.
1/30/99:
I just got the last parts I need to put the bottom end together: the 1-2-3-4 shift forks. Tomorrow and over the week, I'll be prepping the crankcases, pressing in bearings, and checking endfloat on the shafts. I got my FBF pistons and am waiting on the cylinders to come back from being bored and Nik-a-sil'd. Check out a little list of parts I've already accumulated.
I've got the Single FCR41s, short intakes, large K&Ns, new valves, bearings throughout, belts. I scored a set of Ferodo Brake Tech full floating iron rotors. The wheels are assembled with their new bearings and look pretty good polished. Admittedly, I never really cared for polished wheels before, but they do look sharp.
1/31/99:
Started detailing the crank case halves. Found many imperfections in the gasket mating surfaces, inside and out, and I feel spoiled by Japanese bikes. You'd never find gouges or impressions on the mating surface of any Japanese bike made sine 1980. Pulled out all of the dowel pins first, followed by a sanding block with WD-40 coated 400 grit revealing that the mating surface wasn't perfectly flat either.
After spending an hour or so gently sanding the surfaces to remove debris and imperfections, I scoured the whole outer surface with small brushes to remove baked on oil and dirt.
2/99:
Blew the month fiddle-futzing around trying to get a bearing. It seems as though Ducati has run out of the right hand side timing shaft bearing. It's a roller bearing with a removable inner collar. Ducati throws the collar in the trash and the bearing acts directly on the 19.25mm shaft. Ducati wants $92 for it and my bearing supplier found it so cheap that I can resell it for under $40.
3/9/99:
Pressed the crankcase bearings in and placed all of the shafts. No wonder 68mm is the longest stroke allowed - the crankshaft and rods just miss the transmission cluster and the timing shaft. VERY CLOSE!
Anyhow, assembling the transmission was generally without event except that the output shaft has to be tapped in and out. The next step is to bolt it all together and check endfloat on all three shafts. (Picture taken, will be developed and scanned at some point)
I used the same shims as were in it. I didn't know what to expect since I got a differnt crankshaft by trading mine in for a supercrank and the transmission is a "barely used" one from a new 900 that received a close ratio tranny. The crankshaft had zero float and the output shaft had exactly .004", the spec called for. The input shaft had .008". I get to drive to the local dealers tomorrow to find a new shim since none of the ones I have laying around work in any combination.
3/10/99:
The crankcases are together now! What an effort! I went to the best of the local Ducati dealers today and found out that Ducati quit using crankcase gaskets around 1996. Putting the cases together without the gasket solved my shim problem, but was a lot of work. I had to measure the effective width between all of the bearings, make a guess about the shims to use, assemble and torque the cases, measure endfloat, and repeat if necessary. I ended up repeating 4 or 5 times to get it just right.
Ditching the gasket caused me to have to remove some shims for the shift drum and the crankshaft, but they turned out perfect. The input and output transmission shafts were a bit of a pain, but I got the combination of shims just right. I ended up with free rotation and just about .001" on the input and just over .004" on the output shaft. Hopefully that nasty gray Yamabond and my careful prepping of the surfaces will keep oil in the engine.
My arms are absolutely worked. It's easiest to assemble the engine by putting all of the shafts and parts in the left case half. But after putting the right case on, you have to turn the engine over to put in and torque the bolts. You take a runout measurement on the crank and the endfloat for the output shaft. Then you turn it over and measure endfloat for the crank and the input shaft. For each time you check the shafts, you end up flipping the engine 3 times. It seemed to me to get heavier and heavier... more pics taken.
3/14/99:
I test fitted the Malossi intake manifolds and found that you want to use two rear manifolds with the FCR41 singles. The "front" manifold has a sharp bend that won't work with the downdraft FCR, but the "rear" manifold works perfectly with the downdraft carb on the front, horizontal cylinder head.
3/18/99:
Took the heads to a machinist to bore the valve pockets out 1mm to take advantage of the larger valves. Then, they'll go up to Extrude Hone, where the heads will be enlarged and polished using their abrasive media until the heads flow the ideal cfm for the cam specs. Oh, and they're gonna do their treatment to the intake manifolds, too.
3/23/99:
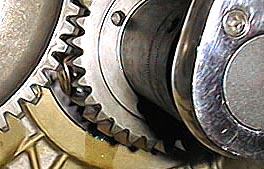 Starting to assemble the components that are driven off the crankshaft. Common practice with mechanics upon reassembly of bottom ends is to place a coin between gears meshing with the crankshaft. There was one Japanese bike I worked on with such large gears that a penny fed its way through!
3/26/99:
Tried to cut the end of my finger off by smashing it with a hammer. I was trying to bang out the oil sight glass, thought that I should just use the press and WHAM! Pain and blood always contributes to progress. The press got it out real easy, too. Anyhow, I got the right hand side cover on, a major visual accomplishment. Also pushed in the timing shaft seal and installed the pulleys. Took measurements of the right side cover bolts so I can get and sell stainless bolt kits.
3/28/99:
Now that I can type again (sort-of)... So I took the frame, engine and Nichols motormount bolts to my machinist yesterday. The cases had a chunk of aluminum sticking out into the passage that interfered with the bolt. A super slow, very large drill fixed that. Nichols directions say to use a 13/32" drill bit on the threaded part of the frame. 13/32" is .406". The bolts were .406". The next size up standard drill bit was .417", so we went with a 10.5mm, or .413" drill bit. We also had to ream out the other holes because I had the frame powder coated.
4/25/99:
Briefly got distracted by work... had a small convention (NAB) to go to. I now have all the hard parts I need to get my bike together!
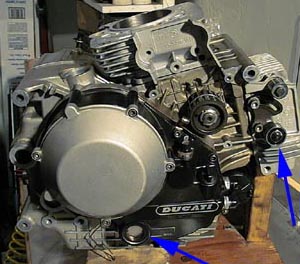 |
Yes, the covers being on does mean that I'm done with all that is beneath them! The arrows point to the new bearings I installed on the timing belt tensioners and the brand new oil sight glass. It was upon removing the old one that I mashed my finger. Those suckers are really a tight fit! |
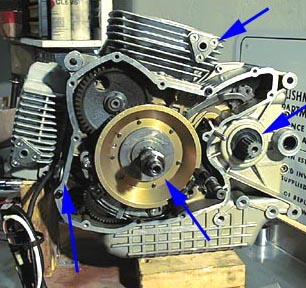
| Notice the Nichols flywheel. The `94 crankshaft I got is not only 3mm larger in diameter behind the flywheel, but also 10mm longer. Tomorrow I pick up the spacer I need for my older, narrower alternator rotor. The other arrows point to the new output shaft seal, stainless bolts installed in the oil pipe fittings on the barrels, and the wiring passing through the crankcase fitting. |
 |
When assembling your motor, don't follow the Haynes manual too closely when it comes to the large oil seal in the right hand side cover. The seal is much thicker than the opening in the cover and must be recessed to the outside of the opening. The manual would lead one to believe that it should be flush with the inside surface of the opening. It's a real tight fit and I didn't have it quite flush to the front. When you assemble the clutch and tighten the hub, you end up pressing the outer basket against the seal if it isn't fully recessed. While the input shaft will turn freely, the crankshaft and transmission input (that the outer basket is bolted to) will have much turning resistance.
4/26/99:
Bottom end is together!
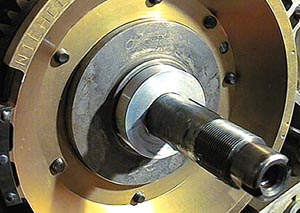 Remember me crying about how the crank is different and I had to get newer parts? Well, see that pretty aluminum collar / spacer in the middle? That accounts for the fact that my `92 rotor is about 9mm shorter than the rotor intended for this crank. It measures 40x20x9 and works perfectly. (Thanks Dave Gopp)
What a milestone! I'm not too happy with the way the paint on the cover turned out, but it'll keep it from corroding and the cover should still keep the oil in. :-)
4/27/99:
 I'm getting the forward cylinder head finished up. This entails pressing in the new bearings, the oil seal, putting on the pulley, lapping the valves, lapping the head to the cylinder, and performing a valve adjustment. Notice the notes. While they have nothing to do with today's work, it is careful notes like this that saves your ass. The factory and Haynes manuals are painfully devoid of critical details. The orientation of those numbers stamped on the rod halves specifically determines which rod is which and what direction they are pointed in. None of the manuals tell you that!
4/28/99:
Got the rear head done. Same as front, lapped the valves and cylinder, cleaned it up, installed the bearings, seal, belt pulley, valves and closing rockers. I'm leaving the closer springs out to make the valve adjustments easier. And were they! The closers were a snap to adjust. The bigger valves moved the valves down about 0.4 mm. The Extrude Hone process made an incredible visual impact (before)(after). I should have the motor together and in the frame by Saturday. I may even have it running this weekend!
5/4/99:
Spent a ton of time over the past 3 days getting here I tell ya, Adam and Dr Drew on the Love Line are pretty funny. And I've gotten to where I know the Mexico National Anthem. Yes, here in San Diego, 91X is broadcast from south of the border. I put the front end together in the wheel vice on the lift and found out that I could put a bungee cord on the front brake and the frame would stay up, like in a stoppie.  Then I put the engine on a bunch of blocks on the lift and lowered the frame down by modulating the front brake. It was almost that easy. Because I had the frame re-powder coated, I spent a few hours retapping the threads all over the frame and drilling bosses where bolts go through made smaller by the extra layer of paint. The swingarm had .060" freeplay side to side, so I shimmed it down to .020". Unfortunately, the Penske shock I got didn't exactly fit. I sent it back and get another to fit test. Those folks are hard core and professional. I also had the front fairing stay re-powder coated black, so it was completely disassembled and took quite a bit of time to get back together. Then came the wiring harness and exhaust system. I can't stand how Ducati zip ties everything to the frame. This leads to unsightly scratches everywhere. Instead, carefully ziptie wires and things to other wires and things and leave the frame alone.
5/5/99:
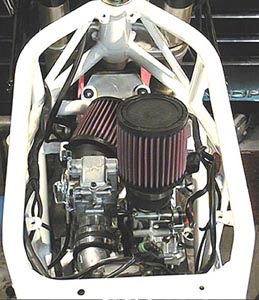 |
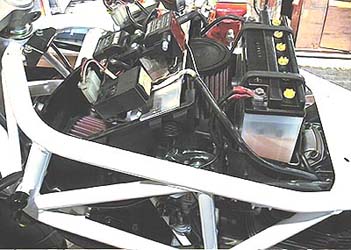
Got the carbs mounted and worked on the airbox. I ended up retaining the plastic that holds the battery, then removed the floor of the airbox area. After removing the lid of the airbox, I realized that I could somehow use those screws to mount the coils and ignition modules. I used 1/8" thick x 2" wide aluminum plate cut to the width of the airbox to mount the original ignition electricals plate. I drilled two holes to mount the aluminum plate to the airbox and two more to mount the electricals to the new plate. |
5/6/99:
Worked from 2pm to 3am finishing up the bike. Had to get larger slow jets for the thing to even idle. Then it took a couple of hours to route the throttle cables properly. I ended up running them from the twistgrip forward to loop in on the right side of the steering stem. Spent the rest of the night getting the bike together... installing the new chain, cleaning and installing the bodywork. Everything takes twice as long as you'd think ... installing new wellnuts, cleaning, adjusting. It all takes a while.
5/7/99:
Rode to work, spent the evening adjusting the carbs idle circuit. I took the time to put in some vacuum connections to fit the mercury sticks to. The idle (or slow) circuit is very difficult to diagnose and tune.
5/8/99:
Went for a 120 mile ride and had a blast! Still need to get smaller slow jets so it'll idle below 2000 rpm. The Ferodo Brake Tech rotors are bedding in nicely. I'm running Braking pads and will probably switch to EBC FA95-HHs soon. The thing makes power! 1st gear wheelies are a joke - just dial up 1/3 throttle quickly and you're lookin at the sky. It'll lift pretty easily in 2nd, too. I also have to be careful when shifting to 2nd, as it'll lift when letting out the clutch even at lower rpms.
A list of some of the parts purchased by 1/99
| Qty |
Part Num |
Item |
Price/ea |
| 2 |
18010011A |
Fork, Trans selector 1,2,3&4 |
58.00 |
| |
25440011A |
Cap, Sight Glass, Oil Insp |
38.97 |
| |
23510073A |
Cap, Rubber cap vertical |
40.62 |
| 4 |
067092010 |
Nut, cyl head |
4.88 |
| 10 |
036499020 |
Wellnut, M6x1 |
2.60 |
| |
18010021A |
Fork, trans selector 5 & 6 |
56.71 |
| |
11710011A |
Push rod, Clutch 900SS |
48.09 |
| |
F93915 |
Valve Stem, 90-degree |
10.00 |
| 2 |
020470105 |
Seal, Cam 2 Valve 22x35x7 |
5.84 |
| |
061947030 |
Washer, safety |
1.30 |
| |
729441542 |
Ring nut, belt pulley |
10.12 |
| 2 |
F15943 |
Valve, 43mm intake 2V |
69.00 |
| 2 |
F15938 |
Valve, 38mm Exhaust 2V |
69.00 |
| 4 |
06074 |
Valve Guide, Racing |
18.95 |
| 2 |
73740021A |
Cam Belt |
14.95 |
| |
751313380 |
Bearing, LHS crank |
37.42 |
| |
751433380 |
Bearing, RHS Crank |
39.82 |
| |
757941542 |
Bearing, RHS Timing shaft |
96.50 |
| 2 |
757911747 |
Bearing, RHS o/p, LHS I/p |
55.50 |
| 2 |
751302566 |
Bearing, LHS on I/p shaft |
23.95 |
| |
751102054 |
Bearing |
14.25 |
| |
937832552 |
Seal 25x52x7 |
8.50 |
| |
937851830 |
Seal 18x30x7/7.5 |
5.25 |
| 4 |
05077 |
Bearing, Half, con rod |
6.95 |